- 01 Setup
- 02 HubSpot view
- 03 Rocksalt view
Step 1
How the integration works
The Rocksalt <-> HubSpot integration syncs any engagement on LinkedIn by your target audience with your HubSpot portal.
In Rocksalt you will see the "Account owner" and "Lifecycle stage" fetched from HubSpot for each contact synced.
In HubSpot you will see an activity in the contact's timeline for the action they took on LinkedIn - e.g. reacted to a post, followed you etc.
You will also see two dynamic lists created in HubSpot -- "Socially engaged - via Rocksalt" and "Social engaged last 14 days - via Rocksalt" that make it easy to see which contacts and deals are being influenced by your efforts on LinkedIn.
These lists are created based on two new properties created by the integration: "Social Engaged - Rocksalt" and "Last Social Engagement Date - Rocksalt".
Optional settings
There are two settings to configure after you've connected the integration:
1. Create new contact record: enables creation of a contact record in HubSpot if a matching one is not found. Note that the contact will not have an email address as that information is not provided by LinkedIn.
2. Create new company record: enables creation of a company record in HubSpot if a matching one is not found.
Notes:
- Sync happens every 24 hours. Each Rocksalt user who is syncing with HubSpot will have their own sync time.
![]()
Setting up the integration
Integrating Rocksalt with HubSpot takes just 5 minutes.
Go to the Audience Engagement menu and click the Setup button. This brings up a dialog with details of what to expect. Click the Connect button to start the process of installing the Rocksalt integration app.

Note that this requires the user to have sufficient permissions to install an app on HubSpot. If necessary, ask your HubSpot admin to login to HubSpot on your computer just for the install to complete and then you can log back in as yourself.
Once the install succeeds you will be redirected back to the Rocksalt Audience Engagement screen.
Notes:
- Only the first user who initiates the integration requires HubSpot admin permissions for the app install to succeed. All further users in that same organization can sync with HubSpot without any special permissions as they do not need to install an app and are just configuring the sync itself.
- Each Rocksalt user has to click "Connect" for their data to be sync'ed to the CRM.
Continue to Step 2 on the next tab
Step 2
What you'll see in HubSpot
Contact and Account object
Contacts that sync with HubSpot will have a new "timeline" event for the social interaction:

The property "Social engaged last 14 days - via Rocksalt" on the contact will be set to the date when the last engagement was recorded in Rocksalt. This allows the account owner or sales rep to trigger a workflow or notification to follow up with the contact.
Dynamic lists
There are two dynamic lists created by the integration:
1. Socially engaged - via Rocksalt: This shows you all socially influenced contacts, which you can then use to show socially influenced deals.
2. Social engaged last 14 days - via Rocksalt: This adds the date parameter so you can see recent socially influenced contacts and hence deals or accounts.
Continue to Step 3 on the next tab
Step 3
What you'll see in Rocksalt
Contacts that sync with HubSpot will now show Account owner and Lifecycle stage information, along with earlier information: name, title, type of social engagement event, and time of engagement.

You can also click "See more" to see the suggested response, if you're following up with that contact, and additional details such as a link back to the contact record in HubSpot.

Status and error messages
Before a contact syncs with HubSpot the account owner and lifecycle stage will say "Not yet synced".
If after the sync there is no information for either account owner or lifecycle stage you will see "Not specified."
If you set the sync to not create a contact record or company record you will see a status message after the sync: "Record not created".
If any other error happens during a sync you will see a message "Sync error" for that record.
Step 1
Install Xpertly and test for yourself
Sign-up on Xpertly's page for Slack admins and get your own unique install link to install Xpertly app in your workspace.
When you click the link, be sure to select the right Slack workspace in your browser if you're logged into more than one workspace.
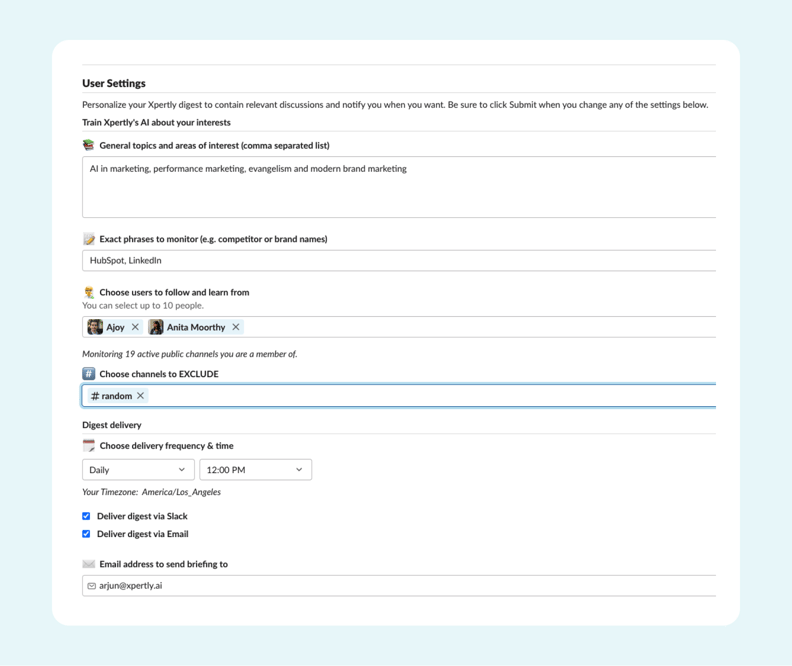
Once installed, go to the app in Slack and in the Home tab, scroll down past "Admin Settings" to "User Settings". There, you can set up your personal digest preferences:
![]()
While you are testing Xpertly, no one in your workspace will be able to sign-up for the app so you can safely test without any impact to users.
![]()
What you will see
You will receive an email digest at your listed time and frequency, with 3 sections:
"My Interests" - disucssions related to your topics of interest or keywords
"Popular" - the most popular discussions in the public channels you're a member of.
"My follow list" - any public discussions authored by people in your follow list..png?width=792&height=793&name=Image%20(22).png)
Continue to Step 2 on the next tab
Step 2
Set defaults and enroll select group of users to gather feedback
Go to the app's Home tab and in the "Admin Settings" section click the "Set Defaults" button. 
In the pop-up dialog that appears, setup default values for any or all of the settings in Step 1. This makes it easier on your users as they get a digest already configured which they can further personalize as they wish.
Next, select "Enable individual user sign-up". This allows users in your workspace to go to the Xpertly app and sign-up simply by entering their email address.  Finally, click on the "Share Xpertly" button to craft a custom message to your users to sign up for Xpertly.
 You can post this directly to specific users whom you want to test Xpertly with or in a specific channel. We recommend a mix of active and inactive users so you can see who values Xpertly's digest more
Sample text to use in message:![]()
![]() Hi all! We have a new app for users to more easily find and contribute to relevant discussions. Xpertly Engage app sends you an email digest of discussions personalized to your specific interests.
Hi all! We have a new app for users to more easily find and contribute to relevant discussions. Xpertly Engage app sends you an email digest of discussions personalized to your specific interests.
Click on the button below to setup the free Xpertly app with your topics of interest and follow specific community users. Xpertly will deliver via email a summary of relevant discussions at a time and frequency of your choosing.![]()
💡 Pro tip: for your reference, this pop-up screen also has a link to the Xpertly Home tab, in case you want to use this link in emails to your users (as might be the case in new user onboarding emails). Scroll below the "Share with channels" section.
Users will see your message as posted below and will click the "Sign-up for Xpertly" button, which will take them directly to the Home tab of Xpertly Engage app.

When a user signs-up you'll see a notification from Slackbot alerting you so you can gauge adoption.![]()
What your users will see
When users click the "Sign-up for Xpertly" button above, they will go to the Home tab of Xpertly's Slack app. There they will see a screen to sign-up with an email account where they'll receive their email digest:

Once signed-up the Home tab will refresh and now they'll see settings to personalize their email digest - topics of interest, people to follow, channels to exclude, preferred digest delivery format (email, Slack, or both) and digest delivery time and frequency.

When users sign up, either individually or automatically, their digest will be setup with the defaults the admin chose. They can then personalize the digest further by going to their settings in the Xpertly app.
Continue to Step 3 on the next tab
Step 3
Enroll all users in Xpertly automatically
In the Admin Settings section, select the option for "Enable auto-enroll".

You'll see a confirmation dialog explaining that all active and inactive users (but not guest accounts or deactivated accounts) in your workspace will be enrolled in Xpertly using the defaults you specified earlier. Also, new users joining the workspace will automatically be enrolled in Xpertly as well.
We recommend a weekly rather than daily digest delivery so that users are not inundated with Xpertly before they appreciate its value. And we recommend you notify users before kicking off auto-enrollment so they know to expect the digest from Xpertly. Below is a template you can use:![]()
Subject: New Weekly Email! Customized Community summaries w/ Xpertly
Body: Hey [name], Ever felt like you’re missing out on great conversations on important topics? 🥳 Or maybe just a bit overwhelmed by all the conversations taking place in our Community?
We’re excited to announce a new feature!! We now have a new app on Slack that will let you instantly customize daily or weekly summary emails, sending insights right to your inbox with links back to those conversations.
You’ll now be receiving a weekly summary email from an app called Xpertly about what’s happening in the Community. Keep an eye out for it in your inbox on <day>.
Check out our Slack post here to customize it!
You can always unsubscribe from those emails but we encourage you to customize the keywords so it’s sending the most useful content right to your inbox.
Let us know if you have any questions!![]()
You can also share this video of how to get the most out of Xpertly with your users.
Once your users get their digest they can easily personalize it to their interests and delivery time preferences. Xpertly automatically sends an email 15 days after users enroll in Xpertly to remind them to personalize their digest.
💡 Pro tip: be sure to also set the email digest sender name and Reply-to address. This ensures your users see a familiar name in their inbox as they may not recognize the sending email address of engage@xpertly.ai. And setting the reply-to address makes it easy for your users to send you feedback just by replying to the email.
Finally, please contact team@xpertly.ai to setup weekly reports on email sends, opens, and clicks so you can track engagement of your users on Xpertly.
![]()
What your users will see
If you've enabled the email digest option, users will get the email digest at time and frequency you've set for them. They can then personalize it as they wish.
If you've selected the Slack digest delivery option, either by itself or in addition to the email digest option, your users will get a similar digest delivered via Xpertly's app in Slack (in the Messages tab). They can personalize the digest as they wish.
.png?width=792&height=842&name=Group%2020%20(5).png)